1.hostPath存储卷
1.1hostPath概述
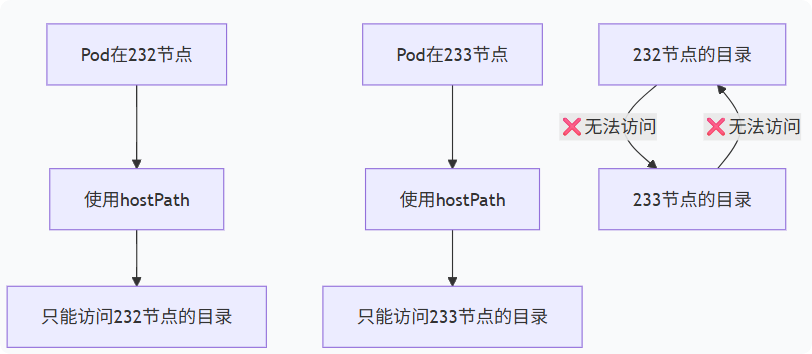
hostPath存储卷的应用场景是: 容器访问worker节点任意工作目录的情况。hostPath 将Pod与特定节点绑定,破坏了K8s的”可调度性”原则,仅在必要时使用。(意思就是232节点的pod就不能访问233节点宿主机的目录)
- 也可以将宿主机时间和容器时间进行同步。删除pod,数据不丢失
1.2容器访问worker宿主机案例
	1.创建资源
[root@master231 deployments]# cat 04-deploy-volumes-hostPath.yaml
apiVersion: apps/v1
kind: Deployment
metadata:
  name: deploy-volumes-hostpath
spec:
  replicas: 5
  selector:
    matchLabels:
      apps: xiuxian
  template:
    metadata:
      labels:
         apps: xiuxian
         version: v1
    spec:
      volumes:
      - name: xixi
        # 声明存储卷类型
        hostPath:
          # 指定宿主机的路径,如果宿主机路径不存在,默认会自动创建
          path: /data
      containers:
      - name: c1
        image: registry.cn-hangzhou.aliyuncs.com/yinzhengjie-k8s/apps:v1
        volumeMounts:
        - name: xixi
          mountPath: /oldboyedu
[root@master231 deployments]#
[root@master231 deployments]# kubectl apply -f  04-deploy-volumes-hostPath.yaml
deployment.apps/deploy-volumes-hostpath created
[root@master231 deployments]#
[root@master231 deployments]# kubectl get pods -o wide
NAME                                       READY   STATUS    RESTARTS   AGE   IP             NODE        NOMINATED NODE   READINESS GATES
deploy-volumes-hostpath-6798f4784c-4cc8h   1/1     Running   0          4s    10.100.1.169   worker232   <none>           <none>
deploy-volumes-hostpath-6798f4784c-7rlzm   1/1     Running   0          4s    10.100.2.150   worker233   <none>           <none>
deploy-volumes-hostpath-6798f4784c-fr74r   1/1     Running   0          4s    10.100.1.168   worker232   <none>           <none>
deploy-volumes-hostpath-6798f4784c-rghb5   1/1     Running   0          4s    10.100.2.151   worker233   <none>           <none>
deploy-volumes-hostpath-6798f4784c-w826c   1/1     Running   0          4s    10.100.2.149   worker233   <none>           <none>
[root@master231 deployments]#


	2.访问测试
[root@master231 deployments]# kubectl exec -it deploy-volumes-hostpath-6798f4784c-4cc8h -- sh   #在232节点修改的
/ #
/ # ls -l /oldboyedu/
total 0
/ #
/ # echo www.oldboyedu.com  > /oldboyedu/index.html
/ #
/ # ls -l /oldboyedu/
total 4
-rw-r--r--    1 root     root            18 Dec  3 03:59 index.html
/ #
/ # cat /oldboyedu/index.html
www.oldboyedu.com
/ #
[root@master231 deployments]#
[root@master231 deployments]# kubectl exec  deploy-volumes-hostpath-6798f4784c-fr74r  -- cat /oldboyedu/index.html  # 该pod在worker232节点
www.oldboyedu.com
[root@master231 deployments]#
[root@master231 deployments]# kubectl exec  deploy-volumes-hostpath-6798f4784c-w826c  -- cat /oldboyedu/index.html   # 该Pod不在worker232节点
cat: can’t open '/oldboyedu/index.html': No such file or directory
command terminated with exit code 1
[root@master231 deployments]#


	3.删除资源
[root@master231 deployments]# kubectl delete -f 04-deploy-volumes-hostPath.yaml
deployment.apps "deploy-volumes-hostpath" deleted
[root@master231 deployments]#
[root@master231 deployments]# kubectl get pods
No resources found in default namespace.
[root@master231 deployments]#


	4.验证worker节点数据
[root@worker232 ~]# ll /data
total 12
drwxr-xr-x  2 root root 4096 Dec  3 11:59 ./
drwxr-xr-x 22 root root 4096 Dec  3 11:59 ../
-rw-r--r--  1 root root   18 Dec  3 11:59 index.html
[root@worker232 ~]#
[root@worker232 ~]# cat /data/index.html
www.oldboyedu.com

[root@worker233 ~]# ll /data    #在232节点才有
total 8
drwxr-xr-x  2 root root 4096 Dec  3 11:59 ./
drwxr-xr-x 22 root root 4096 Dec  3 11:59 ../
1.3容器和宿主机同步时区
	1.编写资源并创建资源
[root@master231 deployments]# cat 05-deploy-volumes-hostPath.yaml
apiVersion: apps/v1
kind: Deployment
metadata:
  name: deploy-volumes-hostpath
spec:
  replicas: 5
  selector:
    matchLabels:
      apps: xiuxian
  template:
    metadata:
      labels:
         apps: xiuxian
         version: v1
    spec:
      volumes:
      - name: xixi
        # 声明存储卷类型
        hostPath:
          # 指定宿主机的路径,如果宿主机路径不存在,默认会自动创建
          path: /data
      - name: haha
        hostPath:
          path: /etc/localtime
      containers:
      - name: c1
        image: registry.cn-hangzhou.aliyuncs.com/yinzhengjie-k8s/apps:v1
        volumeMounts:
        - name: xixi
          mountPath: /oldboyedu
        - name: haha
          #容器中默认没有这个文件
          mountPath: /etc/localtime
[root@master231 deployments]#

	2.创建资源
[root@master231 deployments]# kubectl apply -f  05-deploy-volumes-hostPath.yaml
deployment.apps/deploy-volumes-hostpath created
[root@master231 deployments]#
[root@master231 deployments]# kubectl get pods -o wide
NAME                                       READY   STATUS    RESTARTS  AGE   IP             NODE        NOMINATED NODE   READINESS GATES
deploy-volumes-hostpath-5ff5bb85b7-4lghw   1/1     Running   0         3s    10.100.2.160   worker233   <none>           <none>
deploy-volumes-hostpath-5ff5bb85b7-5cfxb   1/1     Running   0         3s    10.100.2.158   worker233   <none>           <none>
deploy-volumes-hostpath-5ff5bb85b7-65wjx   1/1     Running   0         3s    10.100.2.159   worker233   <none>           <none>
deploy-volumes-hostpath-5ff5bb85b7-8xnbl   1/1     Running   0         3s    10.100.1.174   worker232   <none>           <none>
deploy-volumes-hostpath-5ff5bb85b7-j5ljs   1/1     Running   0         3s    10.100.1.175   worker232   <none>           <none>
[root@master231 deployments]#

	3.查看pod的时间
[root@master231 deployments]# kubectl exec deploy-volumes-hostpath-5ff5bb85b7-4lghw -- date -R
Wed, 03 Dec 2025 12:05:43 +0800
[root@master231 deployments]#
[root@master231 deployments]# date -R
Wed, 03 Dec 2025 12:05:48 +0800


	4.删除资源
[root@master231 deployments]# kubectl delete -f 05-deploy-volumes-hostPath.yaml
deployment.apps "deploy-volumes-hostpath" deleted
[root@master231 deployments]#
2.configMap配置管理(存储卷进阶)
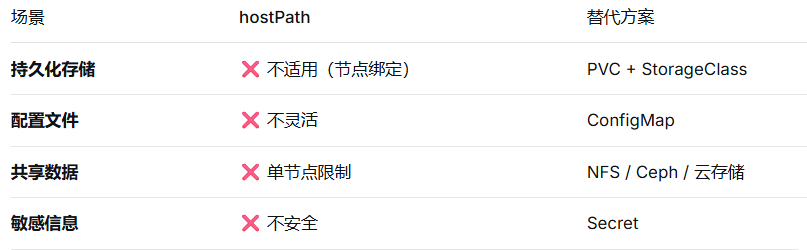
2.1什么是configMap?
“cm”是configMap的简称,主要存储的是配置信息,只要是配置相关的信息都可以用该资源定义。
cm资源存储在etcd数据库中。
cm资源可以被k8s的pod以环境变量的方式注入,也可以基于存储卷的方式注入。
2.2cm的基本管理
1)响应式管理cm
	1.创建cm资源
[root@master231 ~]# kubectl create configmap xixi --from-file=myhosts=/etc/hosts --from-file=myfstab=/etc/fstab --from-literal=school=oldboyedu --from-literal=class=linux101
configmap/xixi created
#要善于利用帮助手册
[root@master231 ~]# kubectl create configmap --help

相关参数说明:
	--from-file:
		从本地文件读取数据作为内容,key可以自定义。

	--from-literal
		自定义key和value。

	2.查看资源
[root@master231 ~]# kubectl get cm
NAME               DATA   AGE
kube-root-ca.crt   1      3d5h
xixi               4      1s
[root@master231 ~]#


	3.查看cm资源的详细信息
[root@master231 ~]# kubectl describe cm xixi
Name:         xixi
Namespace:    default
Labels:       <none>
Annotations:  <none>

Data
====
class:
----
linux101
myfstab:
----
# /etc/fstab: static file system information.
#
# Use 'blkid' to print the universally unique identifier for a
# device; this may be used with UUID= as a more robust way to name devices
# that works even if disks are added and removed. See fstab(5).
#
# <file system> <mount point>   <type>  <options>       <dump>  <pass>
# / was on /dev/ubuntu-vg/ubuntu-lv during curtin installation
/dev/disk/by-id/dm-uuid-LVM-bnHAqpuXu82FBpioU8vuL2VHJrbRd5htZ2cCu4oaG9KR6WhEsT7eOyWGYrsz1L1N / ext4 defaults 0 1
# /boot was on /dev/sda2 during curtin installation
/dev/disk/by-uuid/1ed39505-7b9d-46a1-af6d-67d05107e9df /boot ext4 defaults 0 1
#/swap.img  none  swap  sw  0  0

myhosts:
----
127.0.0.1 localhost
127.0.1.1 yinzhengjie

# The following lines are desirable for IPv6 capable hosts
::1     ip6-localhost ip6-loopback
fe00::0 ip6-localnet
ff00::0 ip6-mcastprefix
ff02::1 ip6-allnodes
ff02::2 ip6-allrouters
10.0.0.250 harbor250.oldboyedu.com

school:
----
oldboyedu

BinaryData
====

Events:  <none>
[root@master231 ~]#


	4.编辑资源
[root@master231 ~]# kubectl edit cm xixi  # 使用'wq'进行保存并退出,和vim命令类似。
configmap/xixi edited
[root@master231 ~]#

	5.删除cm资源
[root@master231 ~]# kubectl delete cm xixi
configmap "xixi" deleted
[root@master231 ~]#
[root@master231 ~]# kubectl get cm
NAME               DATA   AGE
kube-root-ca.crt   1      3d5h
[root@master231 ~]#
2)声明式管理cm
	1 编写资源清单
[root@master231 configmaps]# cat 01-cm-conf.yaml
apiVersion: v1
kind: ConfigMap
metadata:
  name: cm-conf
data:
  school: oldboyedu
  class: linux101

  my.cnf: |
2.3configMap实现配置中心案例
- 配置中心:一个pod就相当于1个服务器,3副本,都是监听90端口,相当于web集群
	1 编写资源清单
[root@master231 configmaps]# cat 04-deploy-cm-xiuxian.yaml
apiVersion: apps/v1
kind: Deployment
metadata:
  name: deploy-xiuxian
spec:
  replicas: 3
  selector:
    matchLabels:
      app: xiuxian
  template:
    metadata:
      labels:
        app: xiuxian
        version: v1
    spec:
      volumes:
      - name: datetime
        hostPath:
          path: /etc/localtime
      - name: data
        configMap:
          name: cm-nginx
          items:
          - key: default.conf
            path: xiuxian.conf
      containers:
      - name: c1
        image: registry.cn-hangzhou.aliyuncs.com/yinzhengjie-k8s/apps:v1
        volumeMounts:
        - name: data
          mountPath: /etc/nginx/conf.d/
        - name: datetime
          mountPath: /etc/localtime

---

apiVersion: v1
kind: ConfigMap
metadata:
  name: cm-nginx
data:
  default.conf: |
    server {
        listen       91;
        listen  [::]:91;
        server_name  localhost;
        location / {
            root   /usr/share/nginx/html;
            index  index.html index.htm;
        }
        error_page   500 502 503 504  /50x.html;
        location = /50x.html {
            root   /usr/share/nginx/html;
        }
    }

[root@master231 configmaps]#


	2 测试验证
[root@master231 configmaps]# kubectl apply -f  04-deploy-cm-xiuxian.yaml
deployment.apps/deploy-xiuxian created
configmap/cm-nginx created
[root@master231 configmaps]#
[root@master231 configmaps]# kubectl get pods -o wide
NAME                             READY   STATUS    RESTARTS   AGE   IP             NODE        NOMINATED NODE   READINESS GATES
deploy-xiuxian-7f76dd69c-4x86b   1/1     Running   0          3s    10.100.1.189   worker232   <none>           <none>
deploy-xiuxian-7f76dd69c-k9k7p   1/1     Running   0          3s    10.100.2.173   worker233   <none>           <none>
deploy-xiuxian-7f76dd69c-s5wj8   1/1     Running   0          3s    10.100.1.190   worker232   <none>           <none>
[root@master231 configmaps]#
[root@master231 configmaps]# curl 10.100.1.189 # 很明显,默认的80端口不生效啦!
curl: (7) Failed to connect to 10.100.1.189 port 80 after 0 ms: Connection refused
[root@master231 configmaps]#
[root@master231 configmaps]# curl 10.100.1.189:91
<!DOCTYPE html>
<html>
  <head>
    <meta charset="utf-8"/>
    <title>yinzhengjie apps v1</title>
    <style>
       div img {
          width: 900px;
          height: 600px;
          margin: 0;
       }
    </style>
  </head>

  <body>
    <h1 style="color: green">凡人修仙传 v1 </h1>
    <div>
      <img src="1.jpg">
    <div>
  </body>

</html>
[root@master231 configmaps]#
[root@master231 configmaps]# kubectl exec -it deploy-xiuxian-7f76dd69c-4x86b -- sh
/ #
/ # ls -l /etc/nginx/conf.d/  # 之前的default文件被覆盖了!
total 0
lrwxrwxrwx    1 root     root            19 Dec  3 16:42 xiuxian.conf -> ..data/xiuxian.conf
/ #
/ # cat  /etc/nginx/conf.d/xiuxian.conf
server {
    listen       91;
    listen  [::]:91;
    server_name  localhost;
    location / {
        root   /usr/share/nginx/html;
        index  index.html index.htm;
    }
    error_page   500 502 503 504  /50x.html;
    location = /50x.html {
        root   /usr/share/nginx/html;
    }
}
/ #

	3.删除资源
[root@master231 configmaps]# kubectl delete -f 04-deploy-cm-xiuxian.yaml
deployment.apps "deploy-xiuxian" deleted
configmap "cm-nginx" deleted
总结
- hostPath存储卷

- configMap
- 很灵活,如一个镜像中的配置文件写死了,在不需要打镜像的情况下,就可以通过cm挂载到容器中从而修改。作者
2632782425@qq.com
相关文章